Please use the following search box to quickly locate valuable FAQ support guide.
You can use key words or full statement to search by. Alternatively you can simply browse by Category below
Only qualified IT Consultants should move or merge EZDent-i database in accordance with HIPAA retention regulations.
All proper backups must be made in advance of conversion process. Vatech America holds no liability in the event of failure to follow recommendations or proper adherence to conversion process steps.
Vatech America REQUIRES that ONLY certified IT professionals setup, manage and monitor daily redundant backups; moves, merges or migrations/conversions for your software database.
Vatech America will only support Certified IT professionals due to strict HIPAA (US) / PIPEDA (Canada) requirements.
Things to check first:
Once a working back up is confirmed, Continue on.
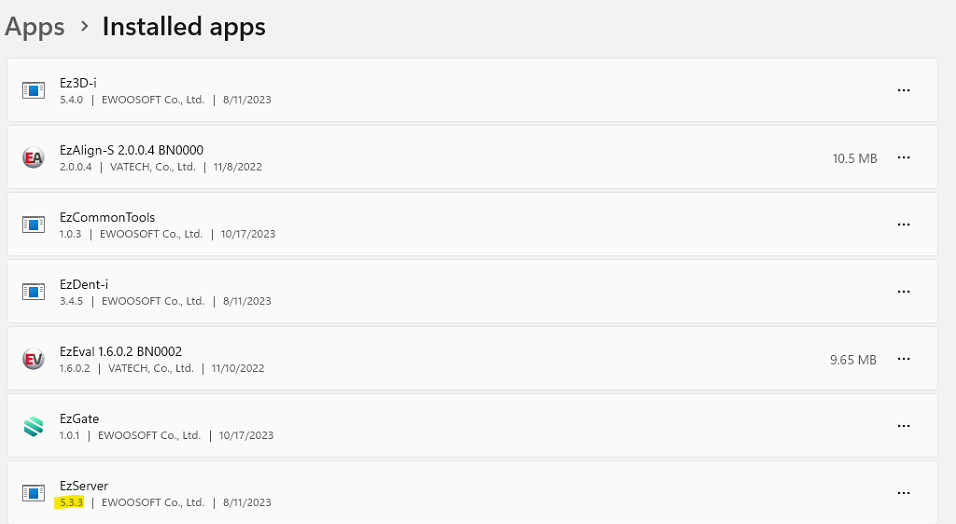
To determine the version of EZServer:
Note: If migrating to Server 2022* you MUST upgrade EzServer to Version 5.5.3 or Newer before migration can occur please follow the EzSeries Update Guide to update EzServer to the latest version before migrating.
Before Starting the Migration process you will need to verify the version you are currently using and verify compatibility.
EzServer - Server Compatibility Guide
You can locate the version of EzServer by using the installation version shown in 'Add or remove programs' located in the control pannel of the *TARGET* PC.
EzServer Version In Use: VTMigration Tool To use:
Up to Version 2.2.0 and up Ver. v2.0.2.1
Up to Version 4.1.6 and up Ver. 2.2.0.2
Version 5.1.1 through 5.5.3 Ver. 3.2.5
Pro TIp:
*It is recommended that you use the latest version of EzSeries: EzServer, EzDent-i, Ez3D-i and use the latest Migration Tool
Ensure all Server locations Source and Destination location PC/Servers are hardwired and NOT using Wifi* as weak Wifi signals can cause disruptions or failures of the migration process.
Downloading Migration tool:
1st: Migration tool can be found in the following link:
2nd: Extract the Migration tool zip folder to the desktop and Navigate to the Bin folder in the VTMigrator folder:
Using the Migration tool
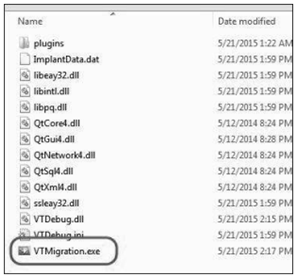
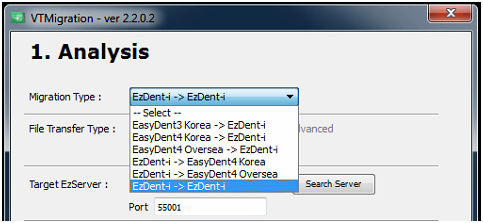
And run the VTMigration.exe to start and the Analysis screen will open:

In Migration Type, select the software you want to migrate:
You must select: EzDent-I -> EzDent-I
EzDent-I -> EzDent-I migration can only be done through the network.
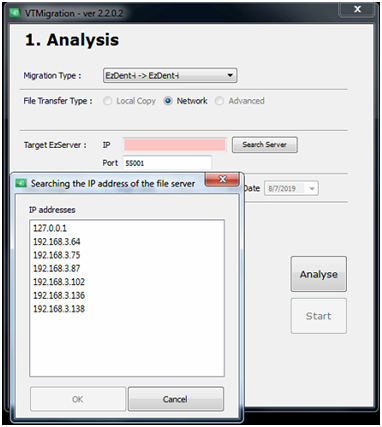
Click Search Server and locate the correct IP Address of the new target location of the EzDent-I DB.
You would use this to move the EzDent-I DB from the Capture PC to an office server or one office server to another new server.
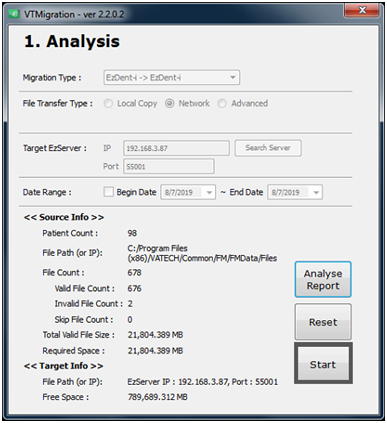
Data Range: Range is an option for you to migrate data from a certain period only. Select this option to migrate data of a certain period. Deselect the option to migrate entire data.
Once you are ready please press Start.
Please refer to the Appendix for more information found on the window above.
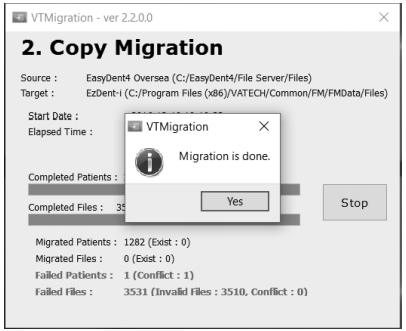
When the migration is complete, you will get a Migration Report.
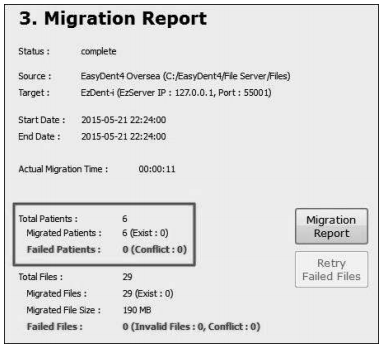
The number of migrated patients of the result report represents the number of patients whose data was successfully migrated.
Failed files are files that cannot be migrated due to conflicts, or do not exist anymore (may have been deleted/moved).
When selecting EzDent-I -> EzDent-I, only the patient information and image data are migrated and the following are not merged:
When selecting EzDent-I -> EzDent-I, only the patient information and image data are migrated and the following are not merged:
Video Guide:
The final step you will need to configure EzDent-i & Ez3D-i (if in use) to point to the new server location. In order to point the software to the new loaction,
please follow the following guide:
How to Configure EzSeries Configuration
Appendix:
Source Info: Source environment analysis info
Patient Count: Total number of patients for migration (duplicate patients are excluded)
File Path (or IP): Source file path for migration
Fie Count: Total number of images for migration
Valid File Count: Number of valid image files
Invalid File Count: Number of invalid image files
Total Valid File Size: Total size of valid image files
Require Space: Required space for files
Target Info: Target environment analysis information
File Path (or IP): Target file path for migration
Free Space: Available disk space
Analysis Report button: Display the detailed report information of the analysis stage
Reset button: Return to the analysis setup stage
Start button: Execute migration