
IT Consultants and Dealers: Dell PC Does not Turn Off Shutdown or Restarts

Written on Aug 5, 2026

GPU / Optic Card / LAN Card Slotting:

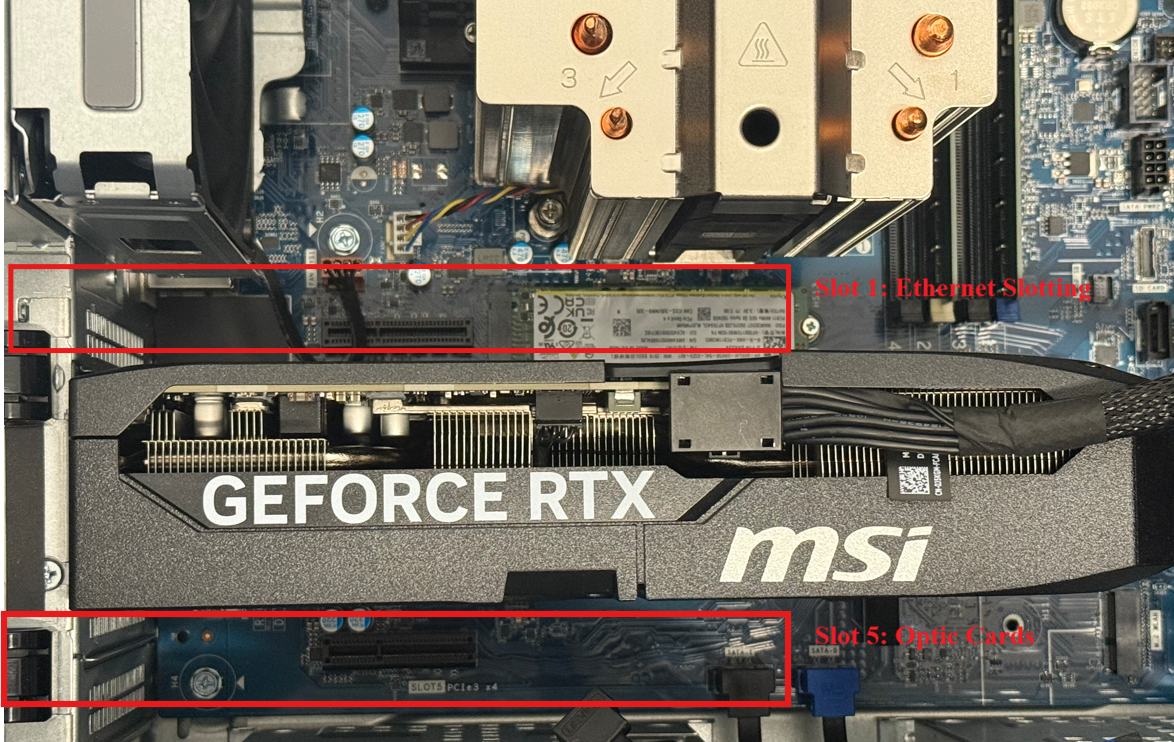
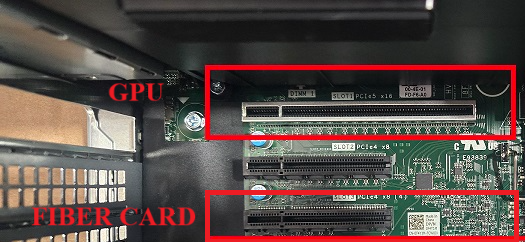
Ensure the GPU, Fiber Optic, LAN Card slotting are in the proper slots depending on your PC and card type as follows: 
 

Dell ProMax:  Green  X21  Units: Ethernet - Slot 1 , GPU slot 2
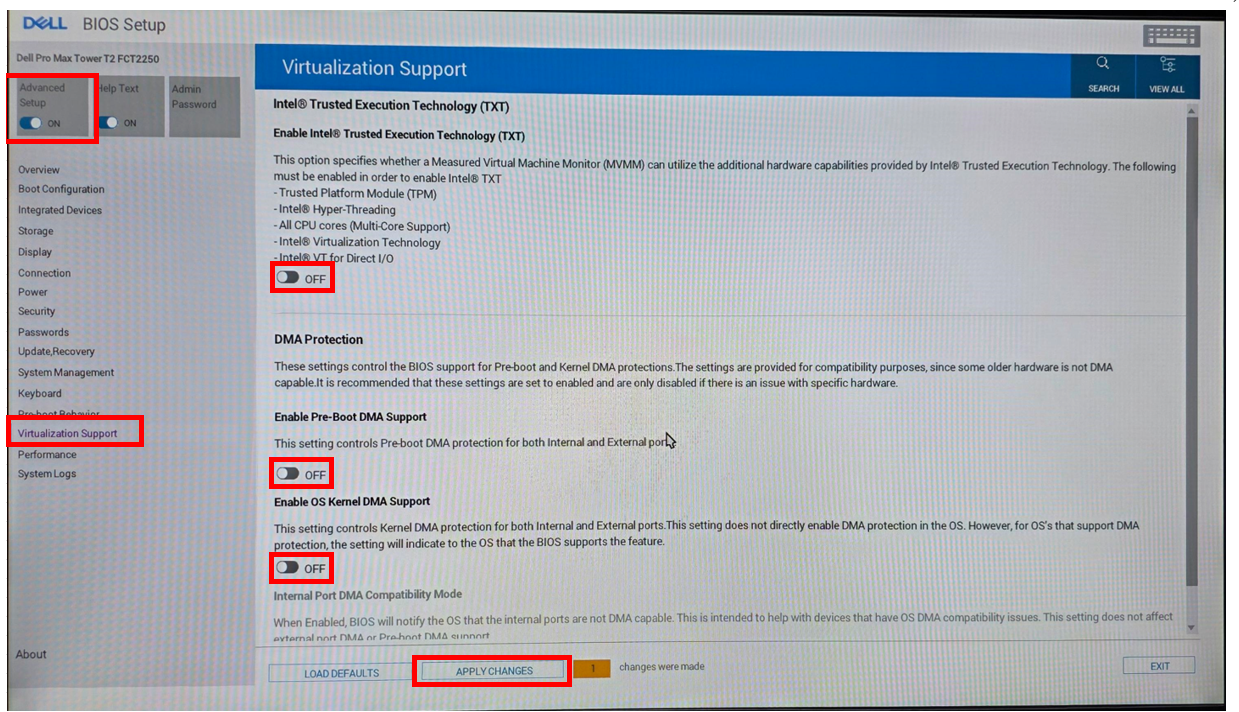
                        Optic Based Units: Slot 5 and Click: Adjust BIOS settings
Dell T5860: GPU - Slot 1 and Fiber Optic Slot 3


Disabling the fast startup option in Control Panel.

Fast startup is a Windows feature that speeds up boot times, but sometimes it may cause shutdown issues.

Disabling it ensures a complete shutdown.


Section A:  
Resolving Computer Does Not Shut Down or Turns Itself Back on | Dell US

Section B: 

Computer Won't Shutdown: Windows Restarts


Section A: 
 

Instructions

  • In specific scenarios, you cannot turn off the computer by performing the normal Operating System shutdown process.

  • You may experience a situation where your computer turns on by itself.

  • The computer may not shut down under these scenarios:

    • The computer stops responding, and the mouse and keyboard do not work.
    • The computer does not shut down when using the Shut Down command or the Turn Off Computer command on the Start menu in Windows.
  • The computer can be woken up by an external device, settings, malicious software, software updates, or even hardware issues.

Perform the steps outlined in the corresponding section to help resolve your issue.

Computer Does Not Turn Off.

  1. Press and hold the power button until the computer powers off, which may take 15-30 seconds.
  2. Wait at least 30 seconds and press the power button to turn on the computer.

Computer Turns Itself Back on.

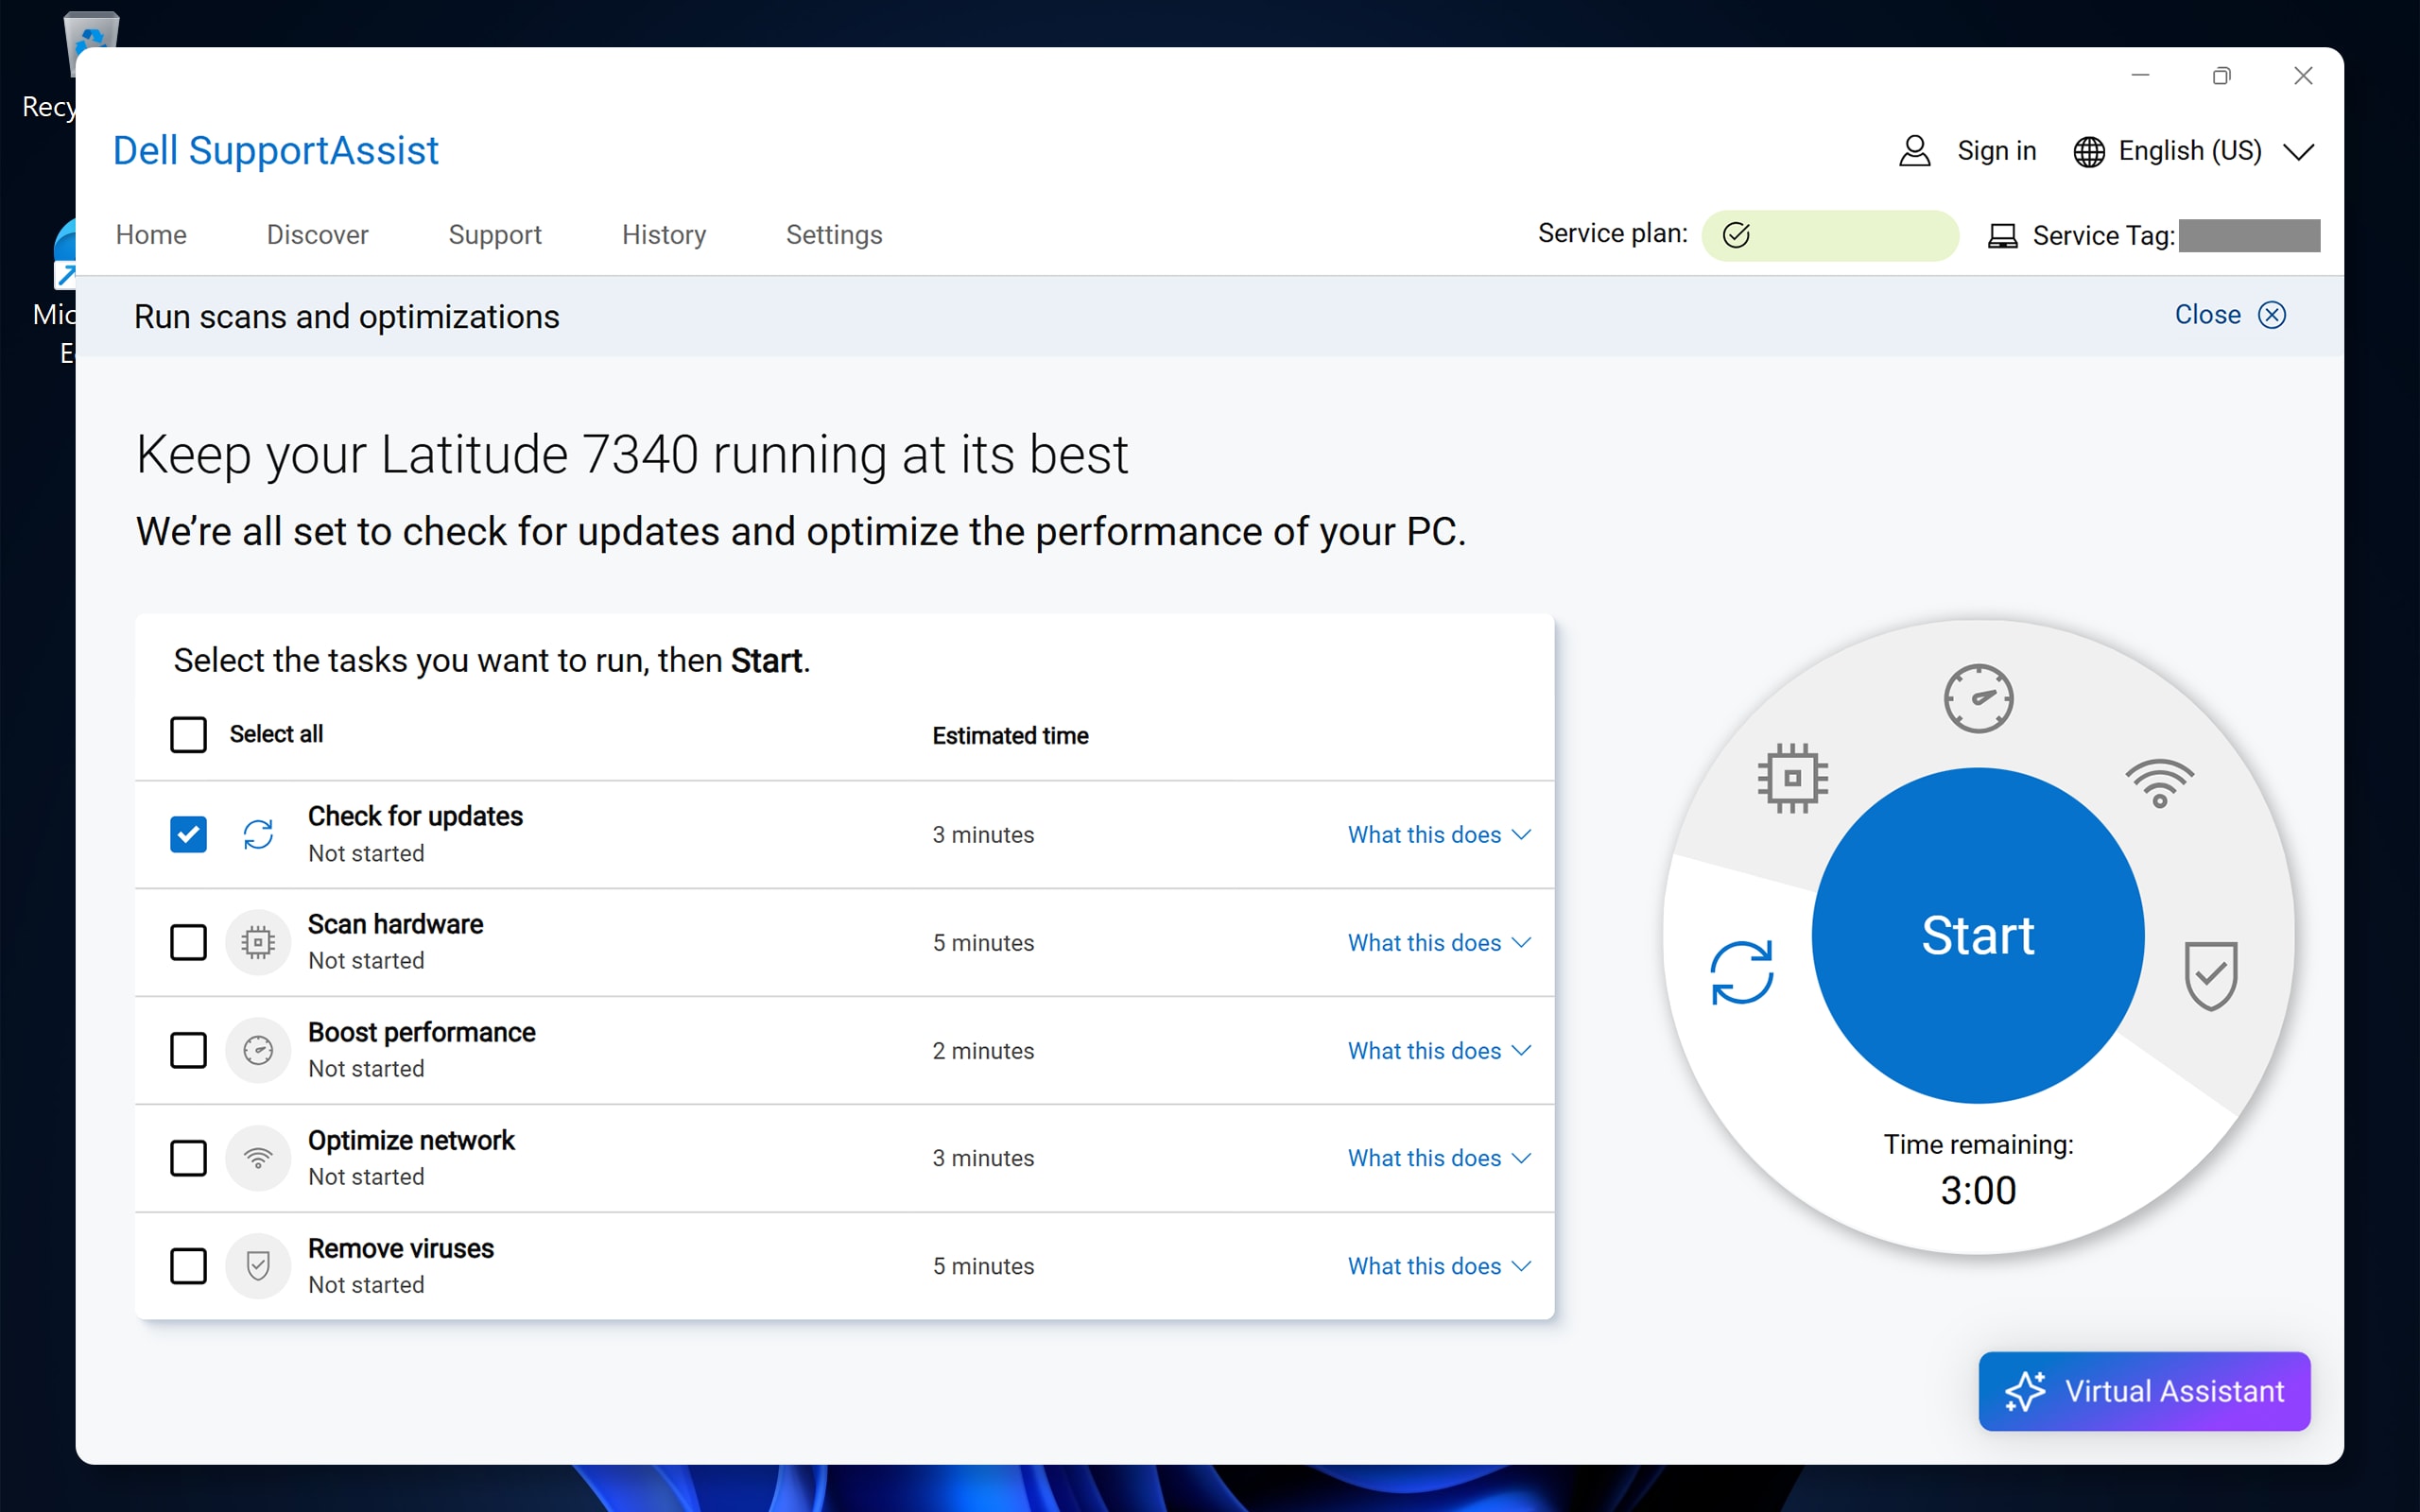
  1. Run the SupportAssist tool.

    Using the SupportAssist application provides automatic computer updates and detects issues such as Malware and hardware issues.

    To run the SupportAssist tool, perform the following steps.

    1. Press and hold the Windows key, and then press the Q key.
    2. In the search box, type SupportAssist.
    3. Select SupportAssist (App) in the list of results.
      NOTE: When SupportAssist does not show up in the search results, go to the SupportAssist for PCs and tablets page for information about downloading and installing SupportAssist.
    4. Touch or click Start Now to run the tests.
    5. SupportAssist runs the tests one by one and provides the results.

There are several options to try to prevent your computer from turning itself on. Dell Technologies recommends starting at the top of the list of the different options since the last option is the most restrictive of all and may prevent your computer from working correctly.

  • Prevent individual devices from waking up your computer

    Certain devices, such as network adapters, keyboards, and mouses, can wake up your computer. To find out which devices can wake up your computer and prevent it from doing so, perform the following steps.

    1. Press and hold the Windows (Windows Key) key, and then press the q key.
    2. In the search box, type cmd.
    3. Right-click Command Prompt (App) from the search results and select Run as administrator. Confirm the selection if asked.
    4. In the Command Prompt box, type powercfg -devicequery wake_armed and then press enter.
    5. Make note of the devices listed.
    6. Press and hold the Windows (Windows Key) key, and then press the q key.
    7. In the search box, type device manager.
    8. Select Device Manager (Control panel) in the list of results.
    9. Select the arrow next to the category of the device that you want to prevent from waking up your computer (Keyboard, mouse, and other pointing devices, so forth).
    10. Right-click the device listing, and select Properties.
    11. Select the Power Management tab.
    12. Ensure the box next to Allow this device to wake up computer is cleared.
    13. You can either change the power settings for all the devices listed or do one at a time to determine which device caused the issue.

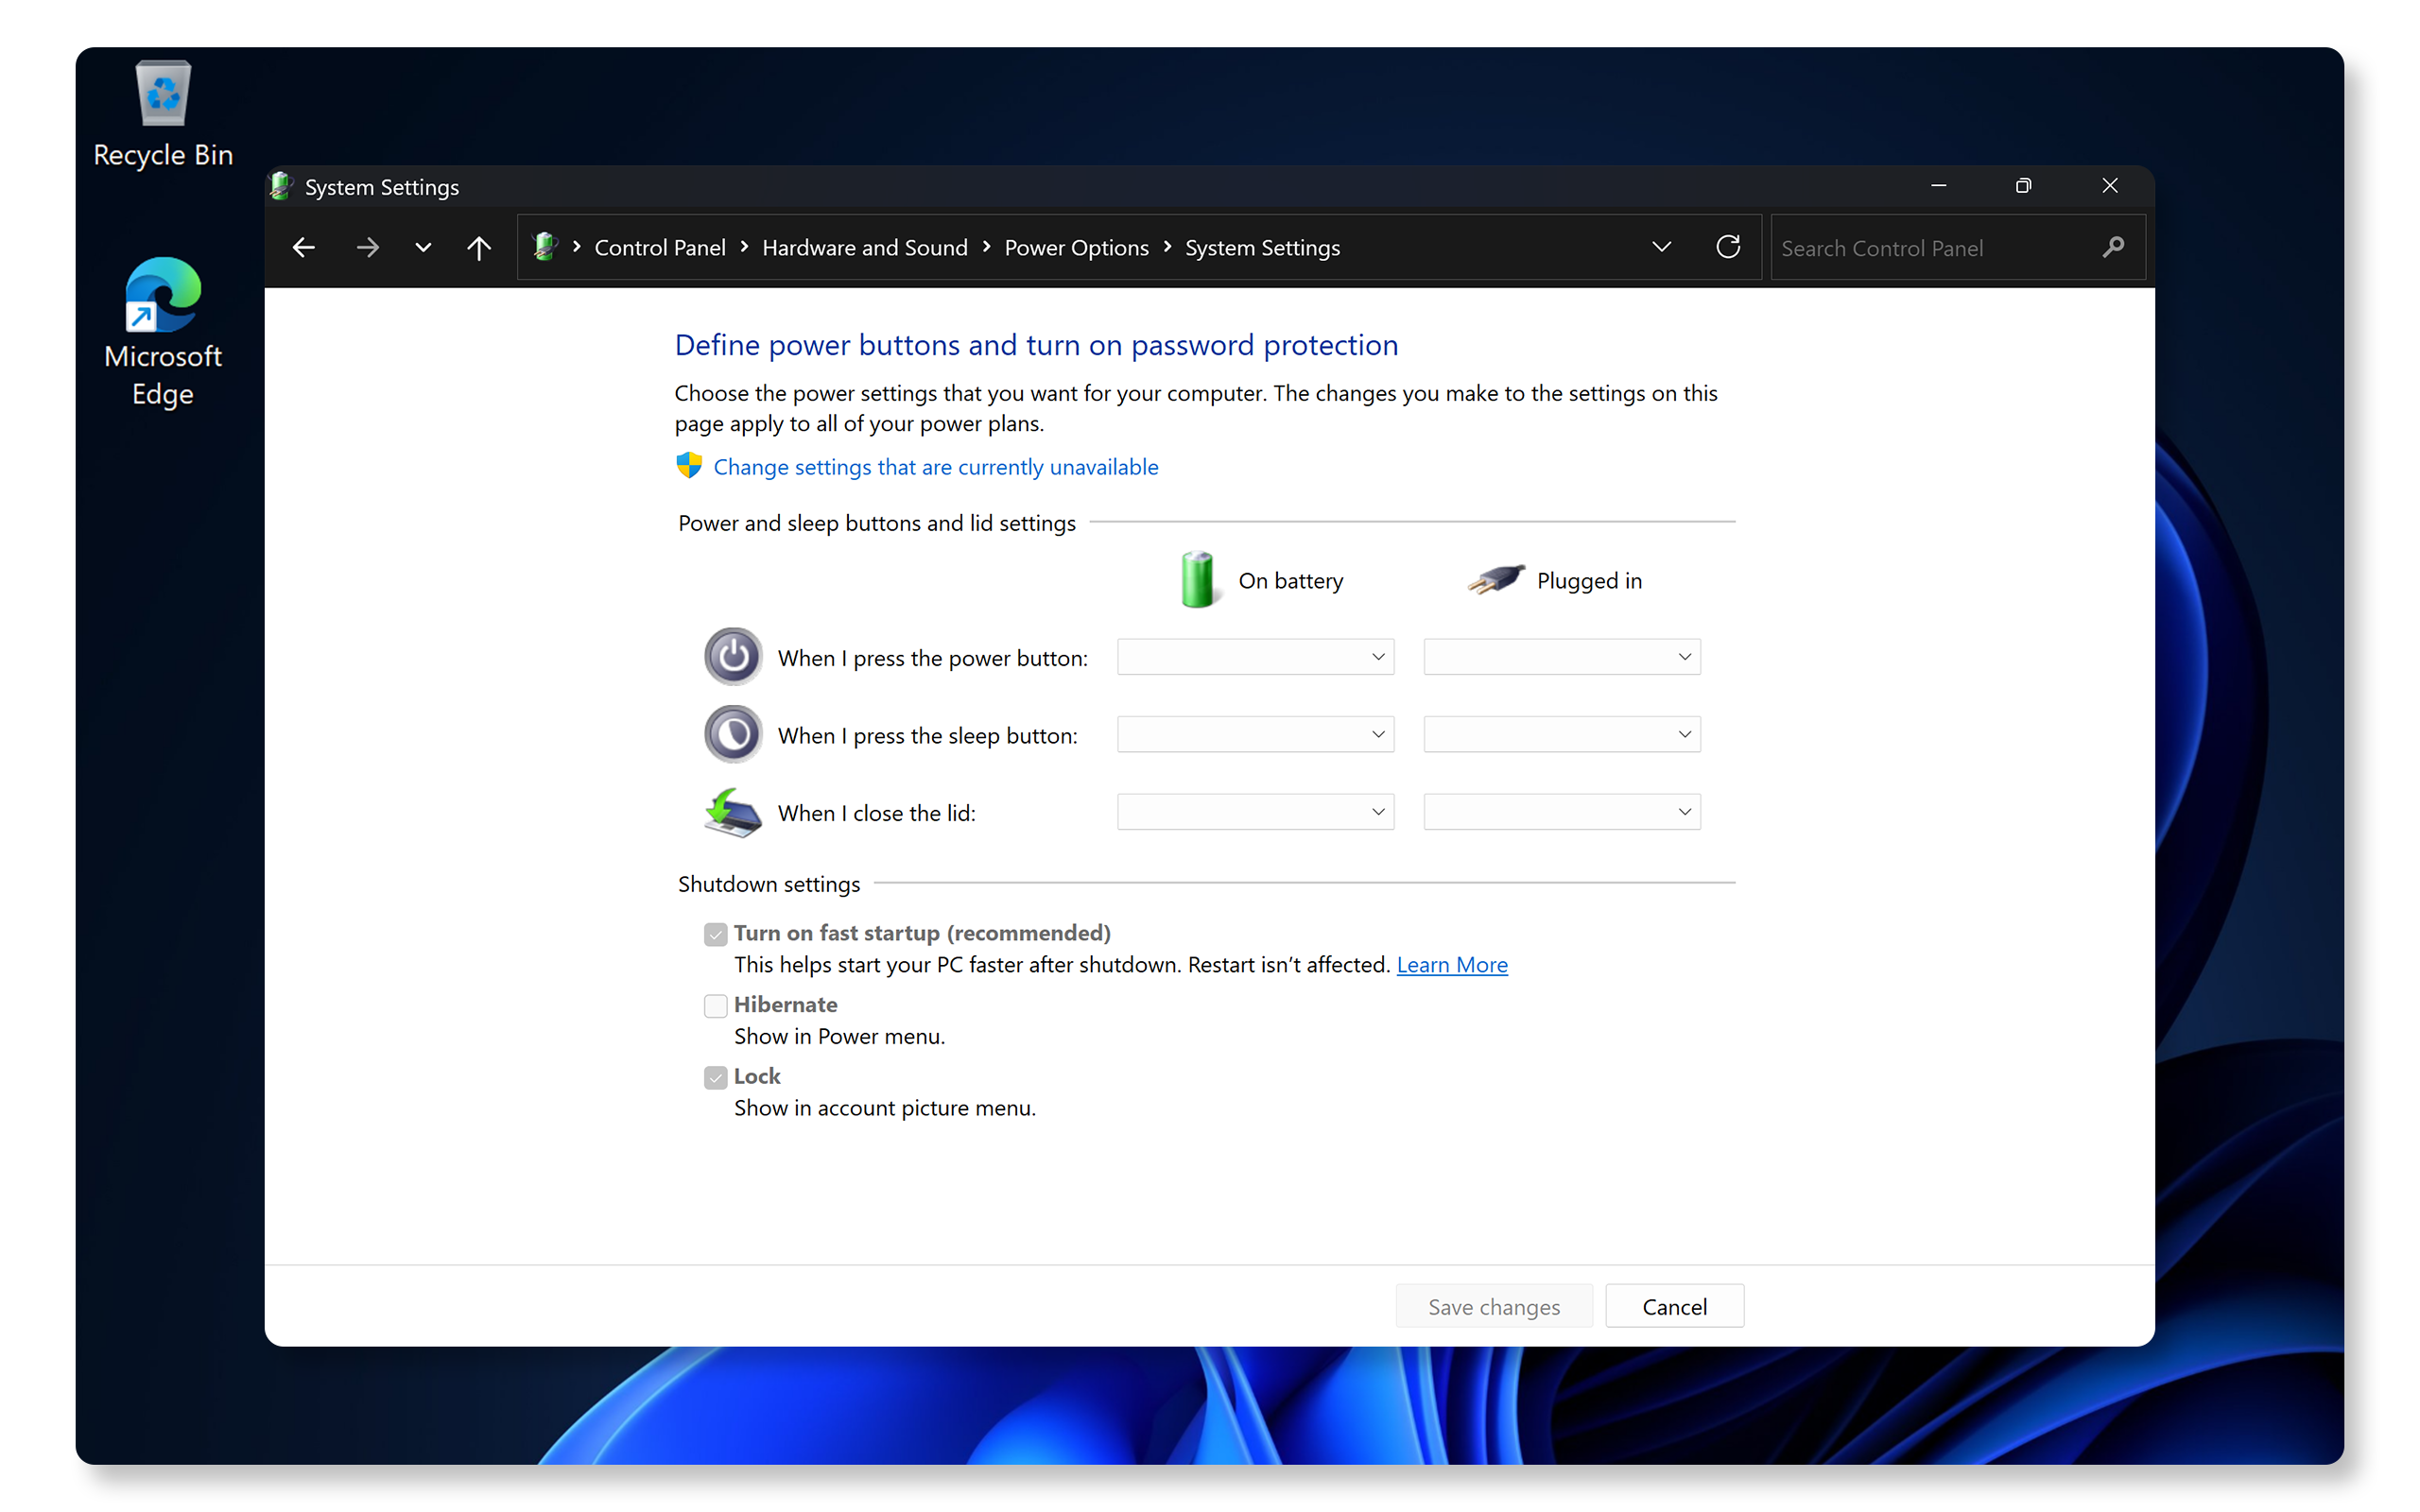
  • Turn Off Fast Startup.

    Fast startup allows your personal computer to start up more quickly but has been known to cause computers to turn on by themselves. Try disabling this feature to see if it fixes the issue by performing the following steps.

    1. Press and hold the Windows (Windows Key) key, and then press the q key.
    2. In the search box type, control panel.
    3. Select the Control Panel (App) from the search results.
    4. Select Hardware and Sound.
    5. Select Choose what the power buttons do in the Power Options section.
    6. Ensure the box next to Turn on fast startup (recommended) is cleared.
    7. Select Save changes.

  • Disable Automatic Maintenance.

    Windows 11 and 10 have a feature called Automatic Maintenance that allows your computer to turn itself on when it must perform maintenance tasks.

    To disable the Automatic Maintenance feature, perform the following steps.

    1. Press and hold the Windows (Windows Key) key, and then press the q key.
    2. In the search box type, control panel.
    3. Select the Control Panel (App) from the search results.
    4. Select System and Security.
    5. Select Security and Maintenance.
    6. Select the Maintenance drop-down menu.
    7. Select Change maintenance settings.
    8. Ensure the box next to Allow scheduled maintenance to wake up my computer is cleared.
      NOTE: The option may be disabled due to other settings that disable this feature.

  • Disable Wake Timers.

    When you want to prevent any scheduled task or device from waking up your computer, you can disable all wake timers globally.

    To disable all the wake timers, perform the following steps.

    1. Press and hold the Windows (Windows Key) key, and then press the q key.
    2. In the search box type, control panel.
    3. Select the Control Panel (App) from the search results.
    4. Select Hardware and Sound.
    5. Select Edit power plan in the Power Options section.
    6. Select Change advanced power settings.
    7. Select the plus (+) next to Sleep.
    8. Select the plus (+) next to Allow wake timers.
    9. Ensure Disabled is selected in the On Battery and Plugged In options.
    10. Select Apply and then OK.

Here are some additional articles related to this topic that might provide support if this does not resolve - Troubleshooting Incomplete Shutdowns in Windows 10 and How to Troubleshoot Overheating, Shutdown, or Thermal Issue on a Dell Computer.


Section B:

Computer Won't Shutdown: Windows Restarts

Sometimes, Windows restarts automatically without shutting down properly. If your Dell computer shows a "shutting down" message but keeps restarting instead, there could be a few reasons behind it. Interference from external devices, the fast startup feature, and corrupted system files are just a few reasons. This article provides simple steps to troubleshoot and fix the shutdown problem effectively.


Why Does a Computer Fail to Shut Down?

There are several reasons why your computer might not shut down properly:

  • Software Conflicts: Apps running in the background can interfere with the shutdown process.
  • Incorrect Power Settings: Misconfigured settings in Windows might cause your computer to restart instead of powering off.
  • Driver Issues: Outdated or corrupted drivers can prevent smooth communication between hardware components, leading to improper shutdowns.
  • Windows Updates: Pending or failed updates can keep your computer stuck in a restart loop.
  • BIOS Settings: Incorrect BIOS configurations might cause startup issues after shutdown.

How to Fix a Computer That Won't Shut Down

Before you start, you can also try to force shutdown your computer by holding the power button for a few seconds. Keep your computer unplugged and switched off for 5-10 minutes before you attempt to boot again.

Disconnecting External Devices

One of the external devices connected to your computer may be causing the unnecessary restarts. Disconnect all the external devices such as docking stations, external drives, or printers and check if that helps.

Closing Background Applications

Background apps or tasks may prevent your computer from shutting down properly.

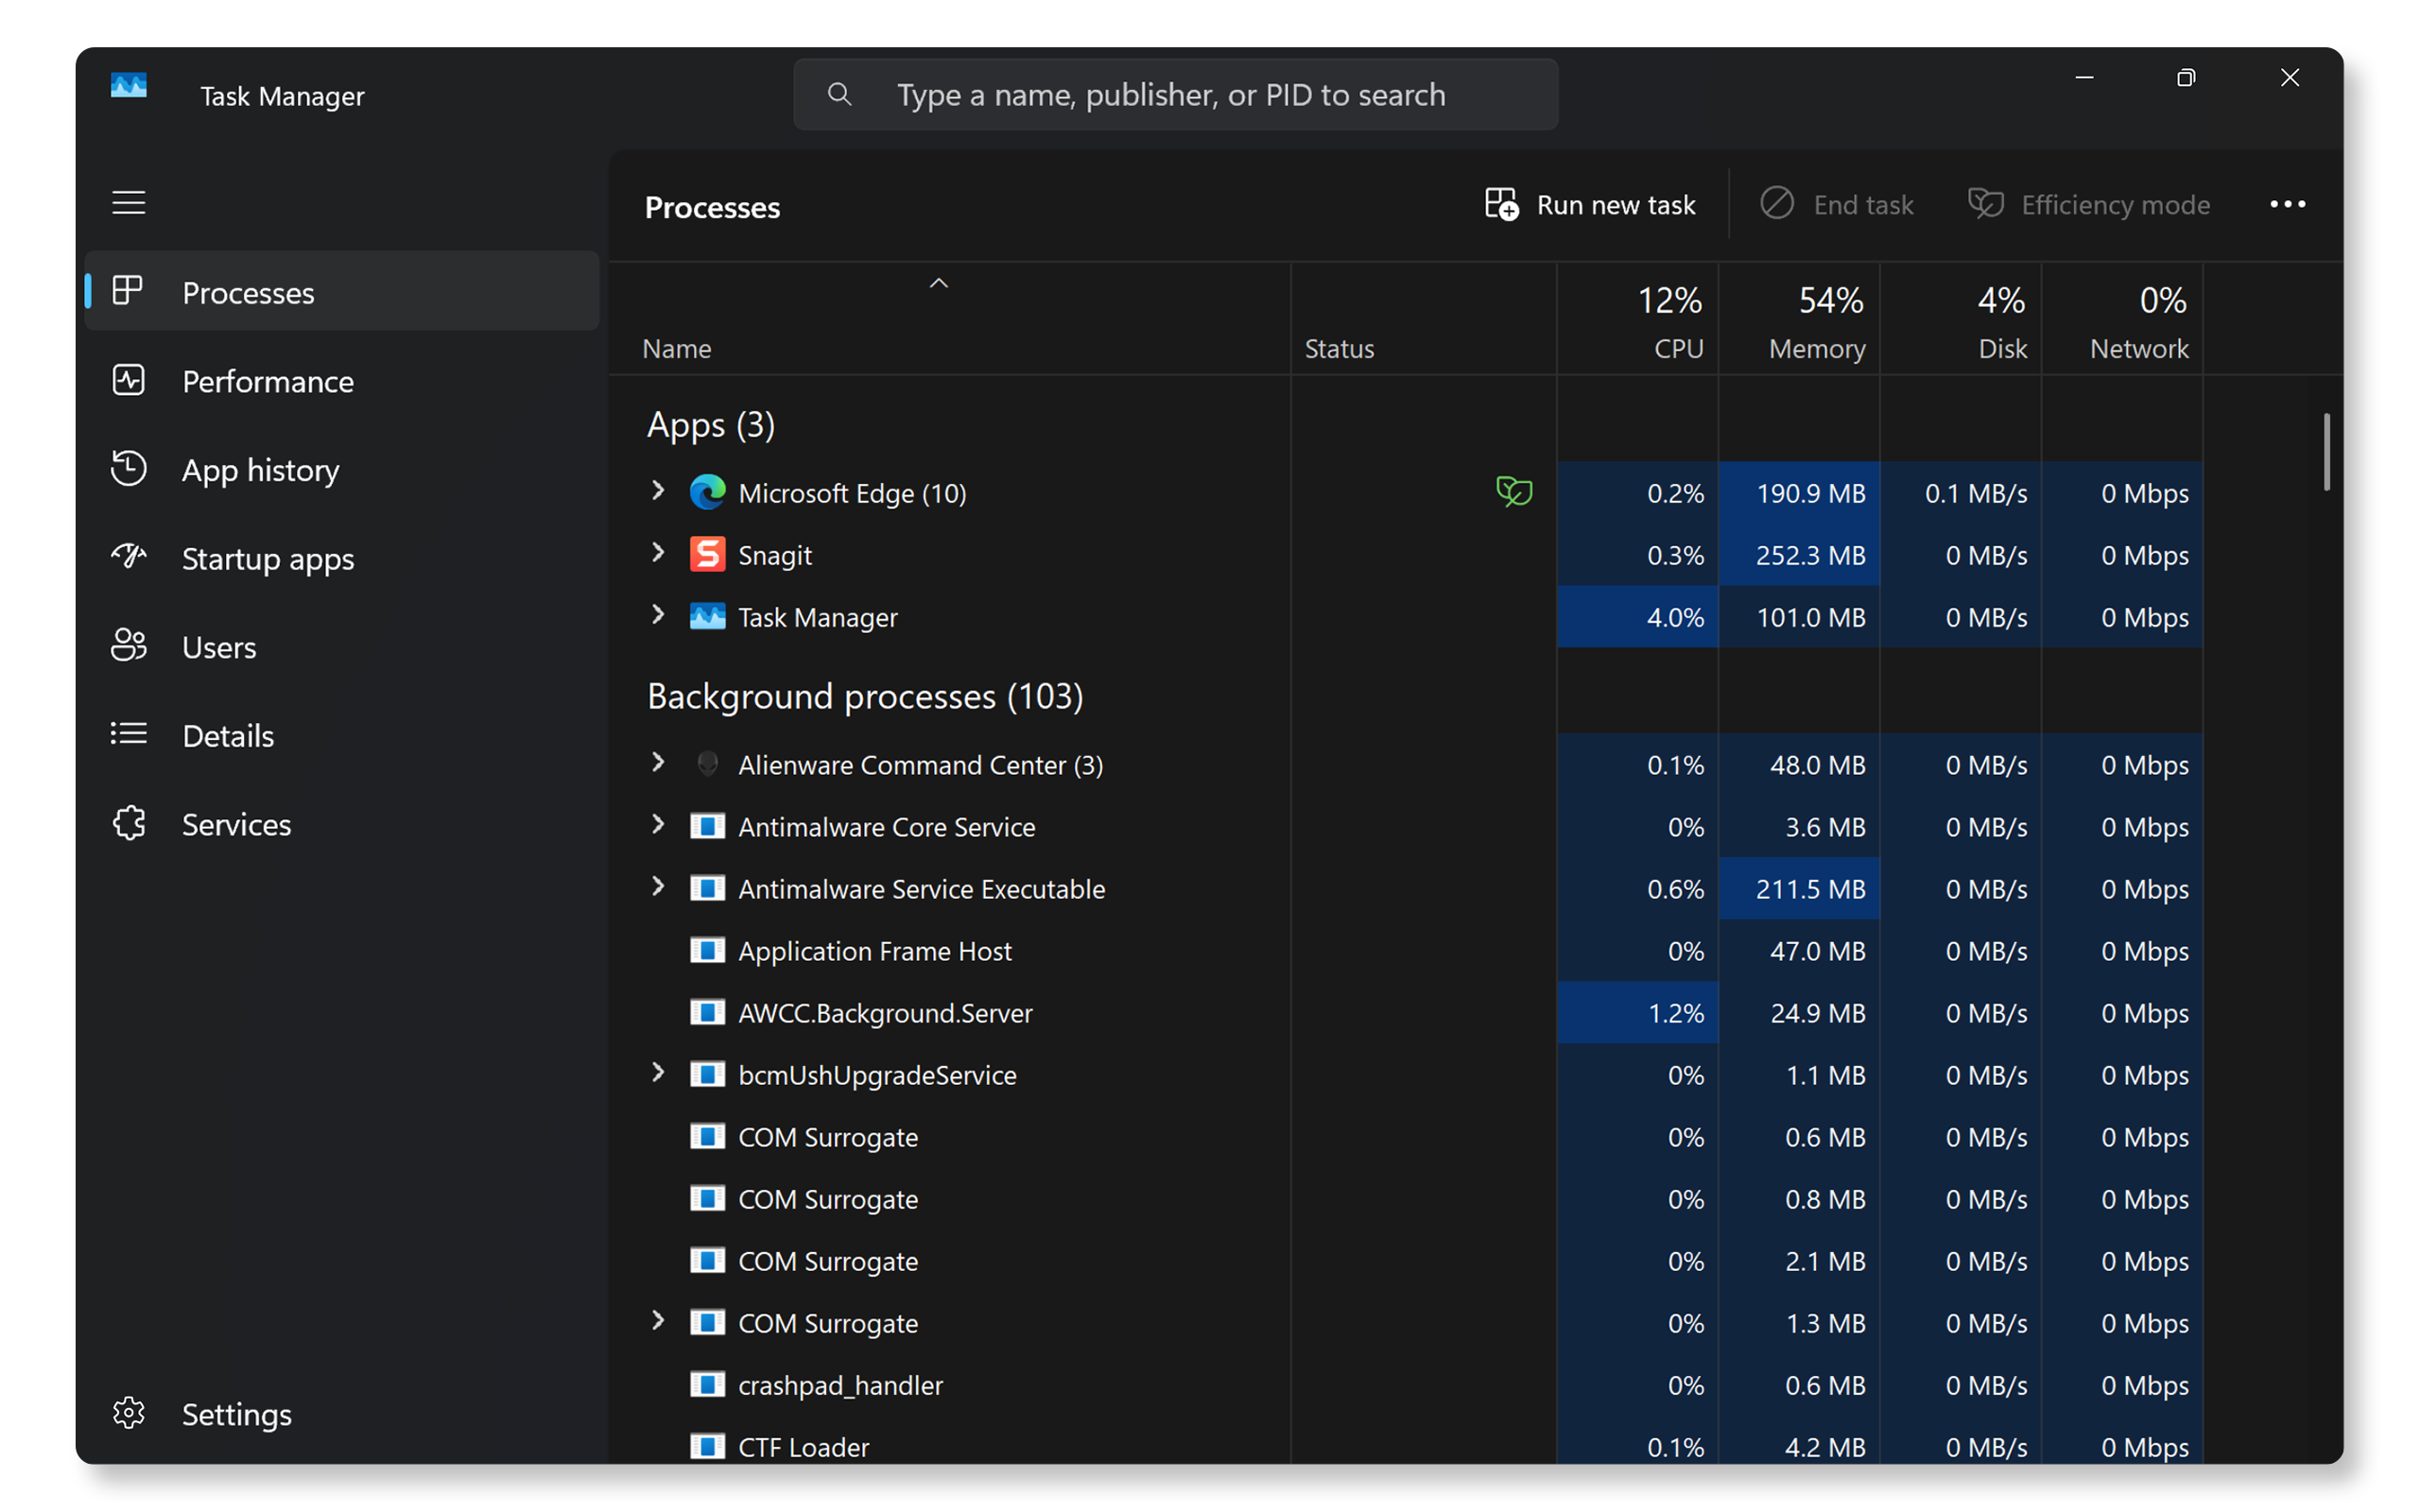
  1. Press Ctrl + Shift + Esc to open Task Manager.
  2. Review the list of running processes under the Processes tab.
  3. Right-click on any non-essential apps and select End Task.
  4. Try to shut down your computer.

If the shutdown issue persists, proceed to the next step.

Disabling Fast Startup

Fast startup feature allows your computer to startup faster after a shutdown. But sometimes, this feature may restart the system instead. Here's how to disable it:

  1. Search for Control Panel in the Start menu and open the app.
  2. Navigate to Hardware and Sound > Power Options.
  3. Click Choose what the power buttons do from the left pane.
  4. Select Change settings that are currently unavailable.
  5. Uncheck Turn on fast startup (recommended) under Shutdown settings.
  6. Save changes and shut down your computer.

If the computer still can't shut down, proceed to the next step.

Updating Drivers and BIOS

Outdated system drivers and BIOS are a common cause of shut down issues. Updating drivers and BIOS ensure compatibility with the latest operating system updates and fixes known issues. SupportAssist is Dell's automated tool that scans your Windows computer for driver and firmware updates, downloads, and installs them.

  1. Search for SupportAssist in the Start menu and open the app.
  2. On the Home tab, select Update Software.
  3. Click Start to check for driver and BIOS updates.
  4. Follow the on-screen instructions to complete the installation and restart your computer if prompted.

If you don't have SupportAssist, refer to our driver update guide for alternative methods to download and install Dell drivers.

If updating drivers and BIOS didn't help, proceed to the next step.

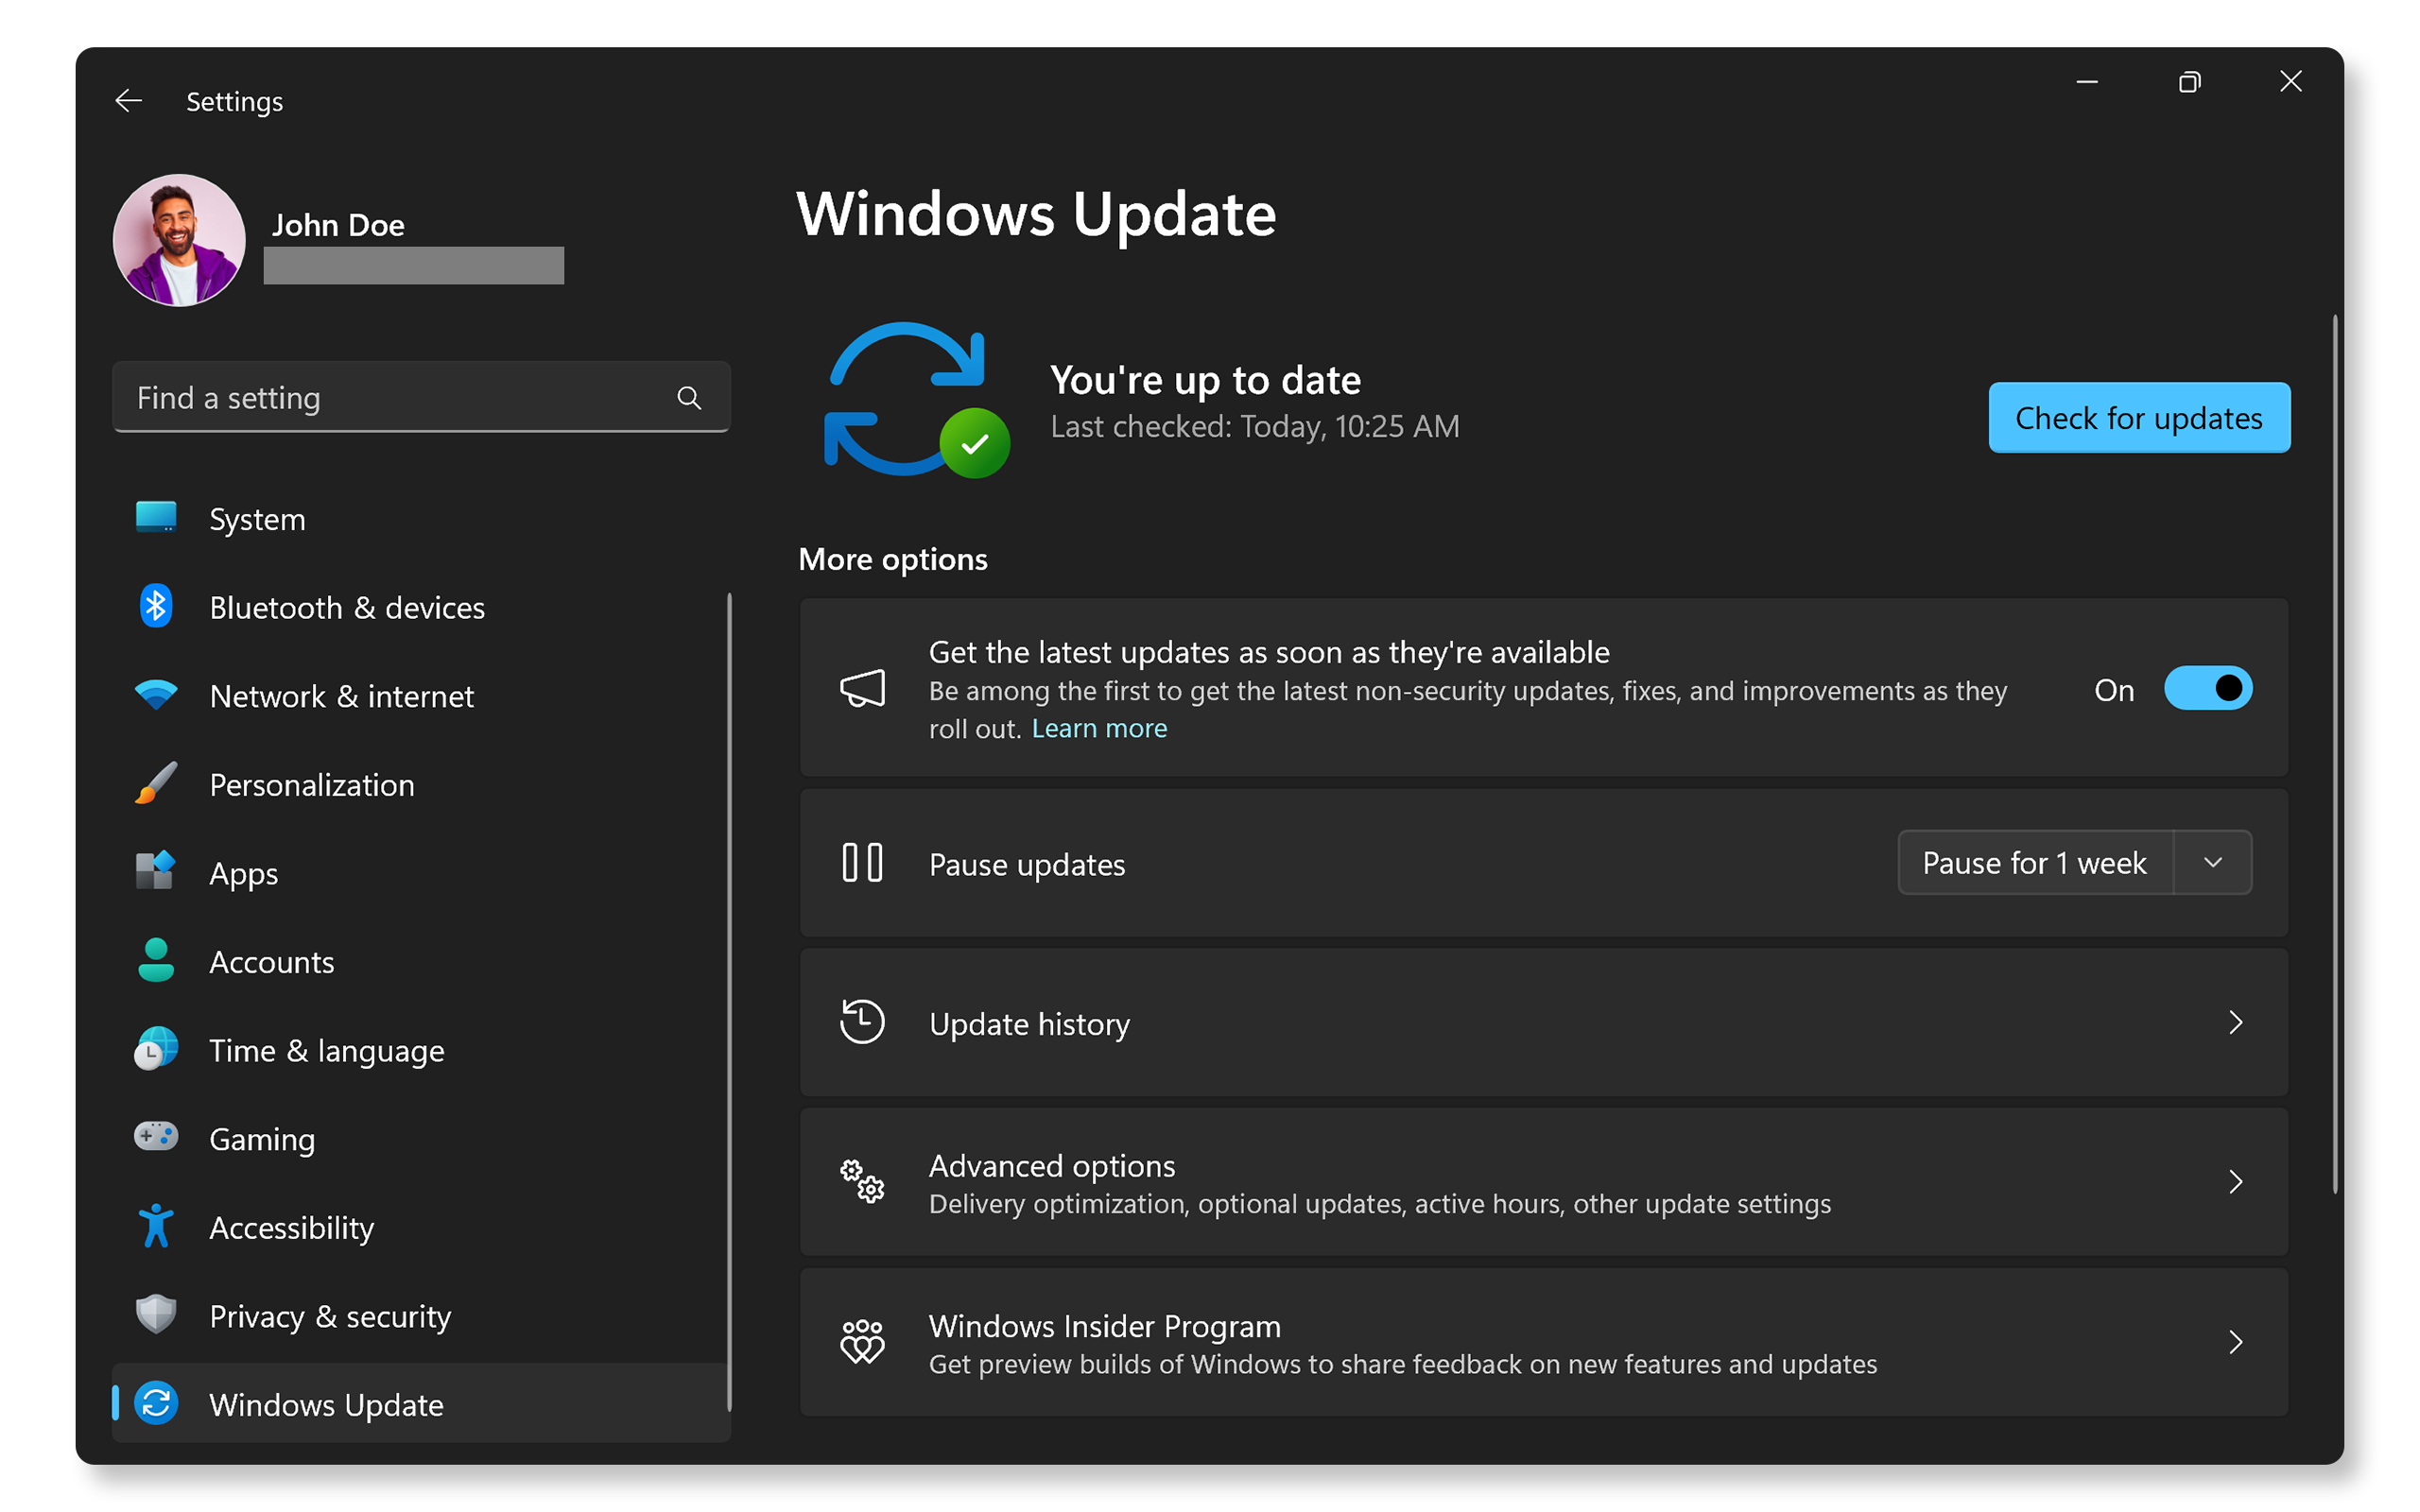
Checking for Pending Windows Updates

Windows updates often resolve compatibility issues but can sometimes cause shutdown loops if not completed.

  1. Go to Start > Settings > Windows Update. Open Windows Update settings.
  2. Select Check for updates and install the available updates.

If updating the operating system didn't resolve the shutdown issue, proceed to the next step.

Disabling Automatic Restart

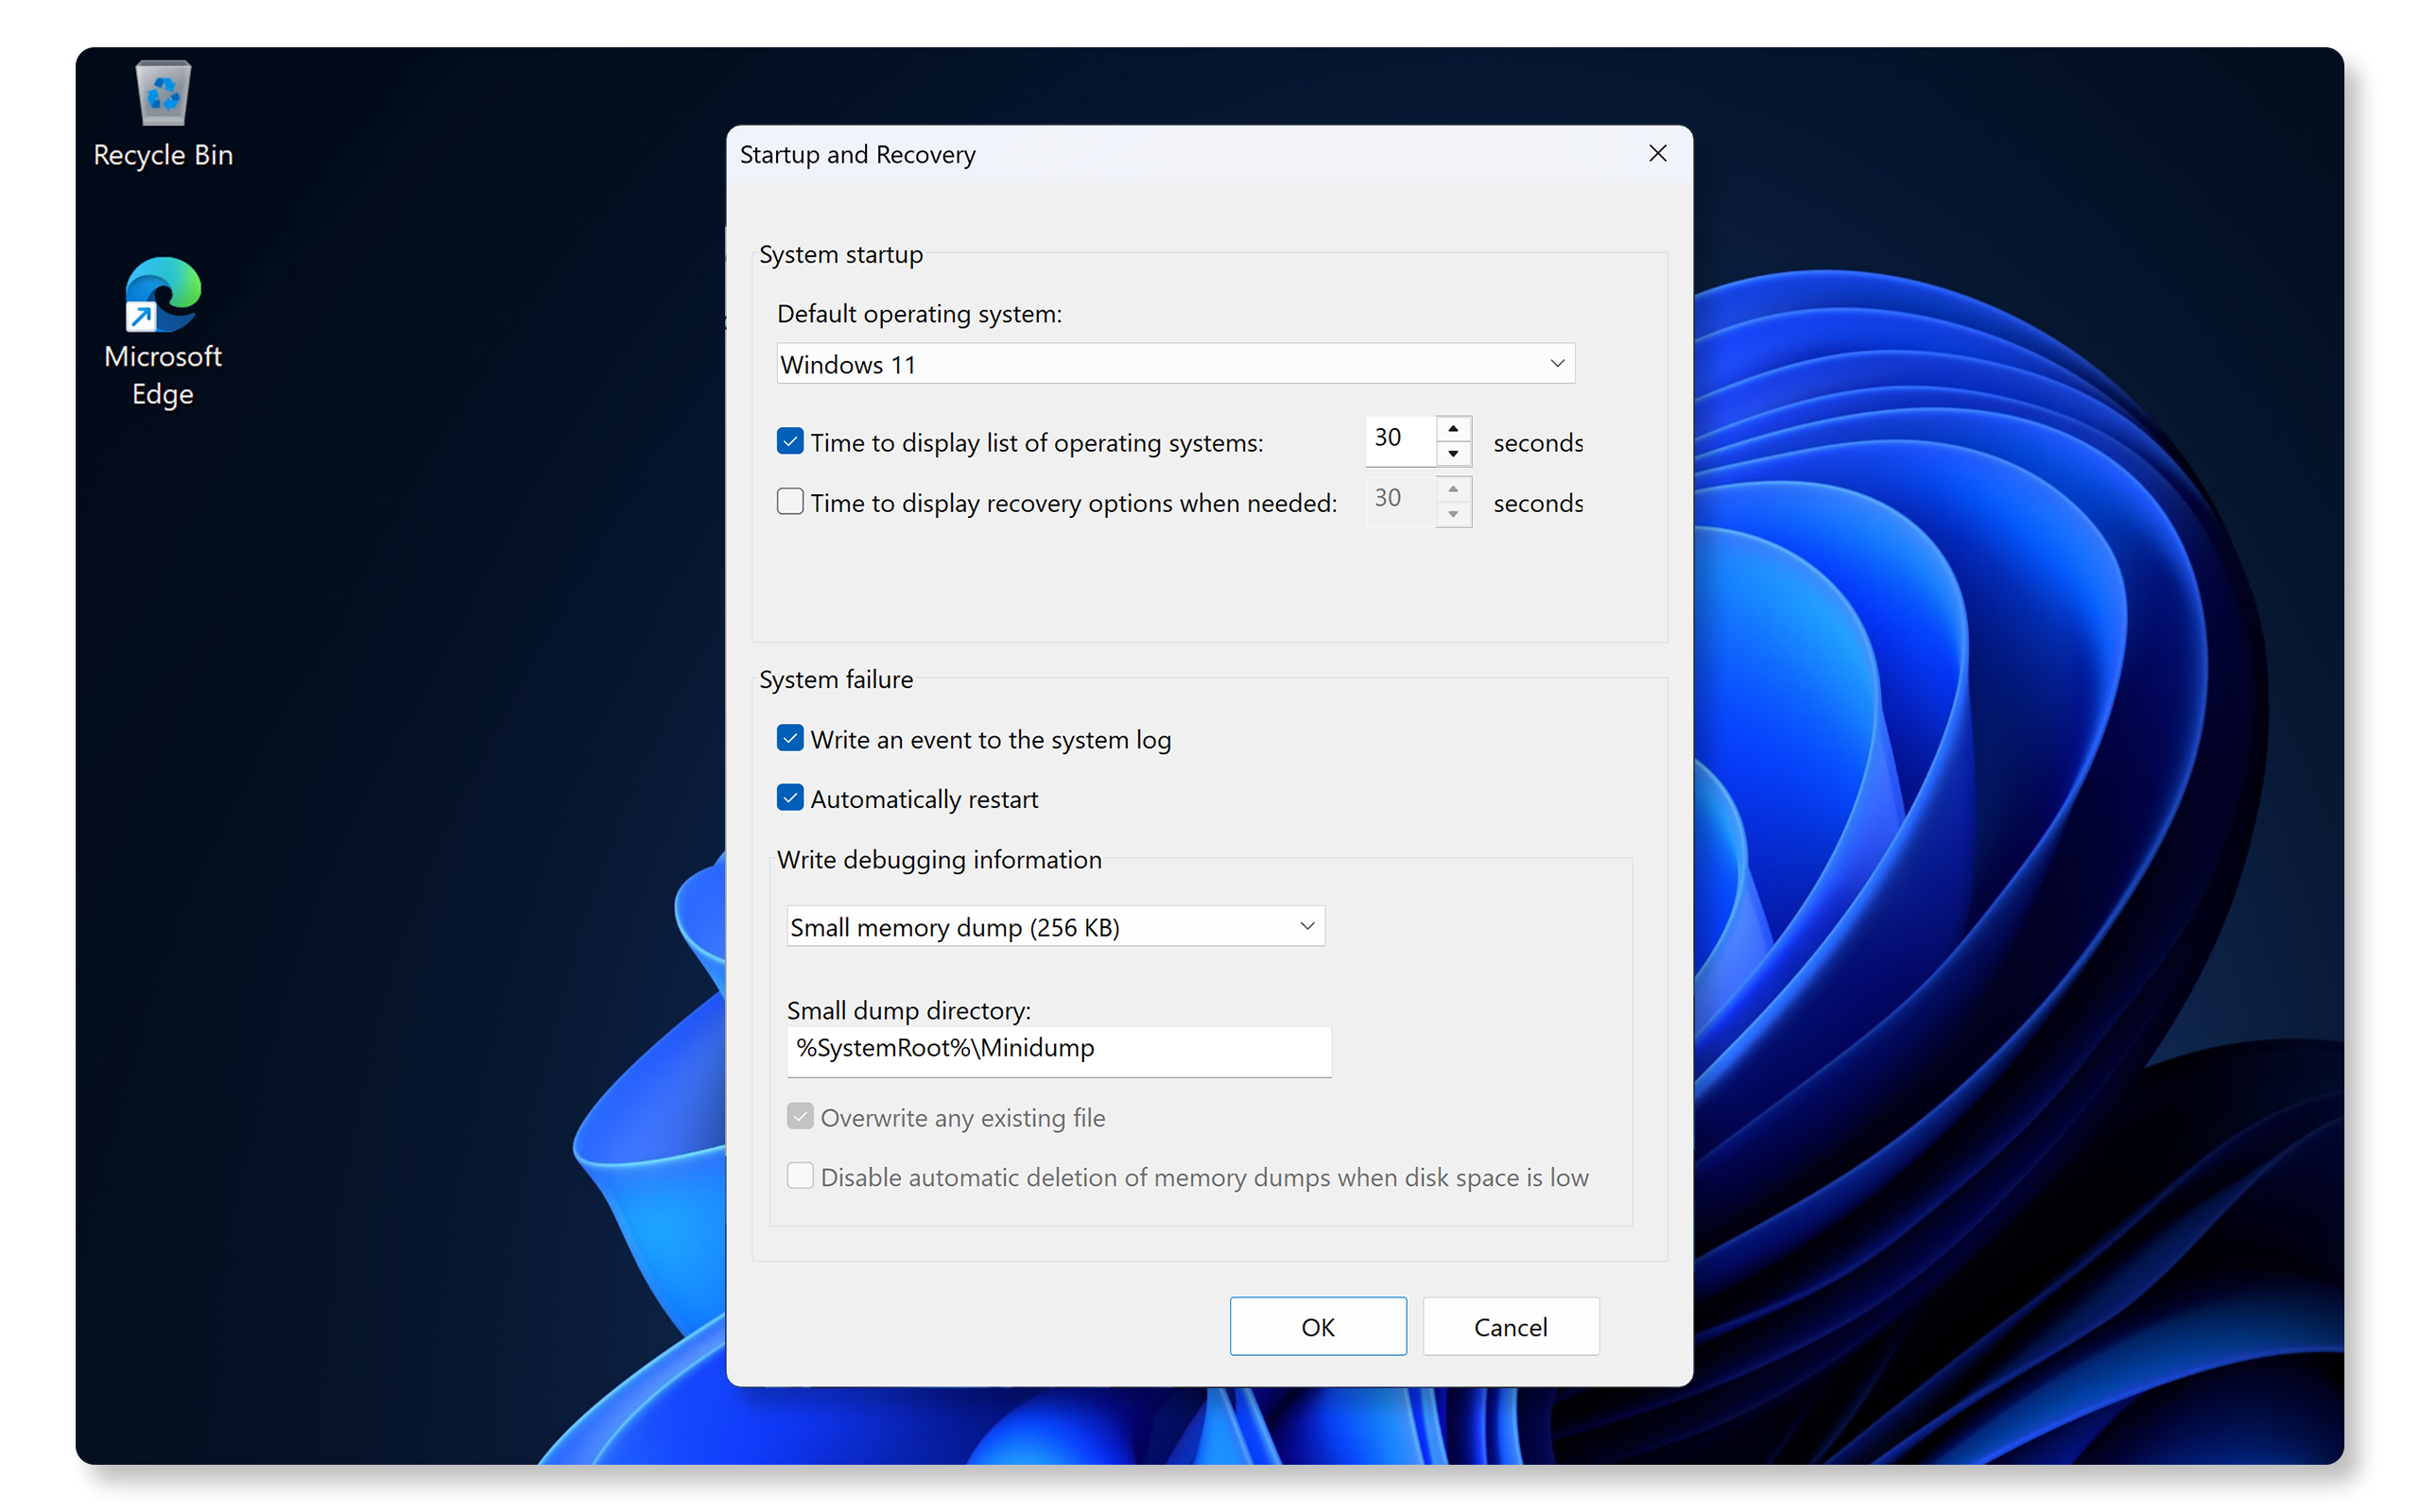
Disabling automatic restart can help prevent reboot loops caused by a system failure during the shutdown process.

  1. Press Windows key + R, type sysdm.cpl and press Enter.
  2. Go to the Advanced tab.
  3. Under Startup and Recovery, click Settings.
  4. Uncheck Automatically restart under System failure.
  5. Click OK and shut down your computer.

If disabling automatic restart didn't help, proceed to the next step.

Running Dell Hardware Diagnostics

Your computer might be experiencing shut down problems due to a hardware issue. A hardware test on your computer's memory, hard drive and other components helps isolate potential hardware issues.

Using SupportAssist

  1. Run the SupportAssist full system test. If SupportAssist isn't installed, follow the prompts to install the app if needed.
  2. SupportAssist will thoroughly scan your hardware, checking the CPU, system memory, hard drive, and more.
  3. Once the diagnostic test is complete, SupportAssist displays the results.
  4. If a hardware issue is detected, you may be guided to update drivers or contact Dell Technical Support for repair options.

If the test passes and the shutdown issue persists, try some additional steps to resolve shutdown problems.
Related Tags

Counts indicate more articles with the same tags

Related Products

Counts indicate more articles with the same products